
Hello LCC members,
HDR is simply a process of combining exposures, which by the way goes back to the 1850’s and was pioneered by Gustave Le Gray to balance the exposure in capturing seascapes. Le Gray used one negative for the sky, and another one with a longer exposure for the sea, and combined the two into one picture in positive. Say what! Yep it’s not a new process.
Here is one of Gustave’s photos

Photo by Gustave Le Gray
The film cameras of days gone by were limited by film sensitivity as are the digital camera sensor of today which only have about 9.5-16stops of range and our eyes have about 20.
Fast forward to the modern day, our cameras are digital and the darkroom computer software which now makes it easier than ever to process our photos. The possibilities for creativity are endless and only limited by your imagination.
Much of the debate and misunderstanding about HDR photography comes from what I call creative processing. You know, images that look cartoony and over saturated. But you know what, that’s ok and it is the photographers creative choice and right to do whatever they want.
How does it work?
Well first you will need software to process the images, choices in HDR software are many Photomatix, NIK and Adobe Photoshop are but a few of the choices. I myself use Photomatix Pro to process my HDR sequences.
NOTE:
Before I explain further I suggest you have your camera and manual ready just in case you are not sure how to set your camera to shoot bracketed photos. This is key to image capture for use as an HDR photo sequence.
After consulting your manual you know how to set bracketing and your ready to run thru the example below.
Image Capture- Example of settings for a wide landscape/seascape shot.
- Put your camera on a tripod, “yes I know I have a love hate relationship with my tripod to” but it is key to shooting a successful sequence.
- Next make sure you have a remote or know how to set your cameras self-timer.
- Set your camera Mode to Aperture Priority Mode. The symbol on most camera dials is “AV” or “AP” and dial in the appropriate aperture.
- Set your cameras Exposure to Bracket -2, 0 and +2 if your camera can do more than 3 that’s great then you can set it at -2,-1,0,+1 and +2 or what ever spacing you desire.
- Set your Focus to manual focus and turn off the Image Stabilizer.
- Setting your Focus, If your lens has a scale built in indicated Meters/Feet set it to 1-Meter or 3-Feet if it does not pick something in the foreground of your composition about 3-feet away and lock your focus on that area.
- Set your Aperture to F16, F22 or the highest your camera/lens combo will allow. The Aperture setting will also depend on the quality of your lens. You will have to experiment to find the setting that yields the sharpest results.
- Compose your photo and fire away 🙂
I will give an example of processing with Photomatix Pro in a future video post.
Here are a couple examples of photos I shot on the St. Bernards field trip last week.
-

- PHOTO #1 was shot at 0-EV which according to the camera was the correct exposure. But this was not what was seen thru my eyes as I looked at the scene.
-
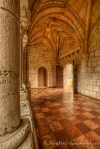
- PHOTO #2 was processed using a 5-shot bracketed set with the EV (Exposure Value) set at .7 EV spacing. This is a more accurate representation of what my eyes could see in this scene.
