Hello LCC Members,
We covered this in a couple of our monthly learning sessions but here is a video from ON1 on Exporting in case you were unable to attend the sessions.

Hello LCC Members,
We covered this in a couple of our monthly learning sessions but here is a video from ON1 on Exporting in case you were unable to attend the sessions.
Hello LCC members,
Several members have been asking about On1 Photo Raw 2018 and have requested a before and after image example.
Here we go!
This is the RAW capture Meta Data.
What is Meta Data? Meta Data is the cameras recorded settings at time of image capture and looks like this.

The Meta data important stuff is toward the bottom of this panel which shows. Exposure 0.3sec at f29 Focal, length 20mm, ISO 50, Flash Did not fire, Canon 5D Mark II, Sigma 12-24mm
NOTE: What the meta data does not show is the focus information which is: Manual Focus set to 1meter (3-Feet) which is how 99% of all my wide-angle landscape/seascape photo are captured. On a trip-pod of course.
Here is the Straight Outta Camera raw Image.

Here are the post processing steps I used in ON1 PhotoRaw 2018
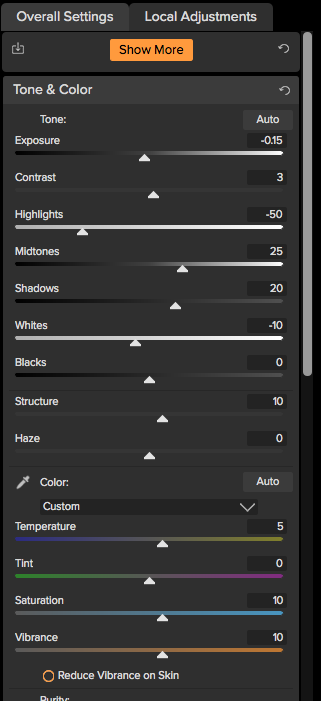
First step was to open the image in the Develop Module and make the adjustments as indicated in the screen shot above.
Next step was to move to the Effects Module making the list of adjustments below.

Haze Reduction
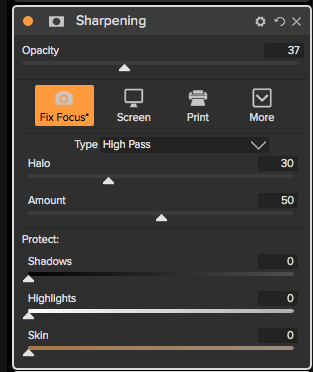
Sharpened slightly with the Fix Focus Preset
Next were a couple of color adjustments

Fall Preset to warm the image up a bit and bring out the yellow and orange tones.

Sky preset to bring out the blue in the sky

Increase Color preset to increase overall image colors

Tone Enhancer with Clarity Preset as you can see by the opacity slider this was a very small adjustment. You have to be careful with this adjustment because Tone Enhancer is in short a Contrast adjustment. If you add too much run the risk of making the image will actually loose some clarity.

Final adjustment was to bring up the light on the beach. The HDR Look panel does a great job with this. I used the Natural Preset and only lightly applied it. If you use too much you run the risk of glow and halo around clouds and other objects in an image. But, heck you may want that look and that is ok to. Remember you are the artist and your photo is an expression of your vision.
In the final steps I used the Eraser Tool to remove sensor dust and unwanted whispy clouds that I felt were a distraction.
Then I cropped a very small portion off the top and straitend the horizon line.
Here is the final image

Here is the before and after side by side.


If you have questions or comments let me know.
Steve
Hello LCC members,
Several members have been asking about On1 Photo Raw 2018 and have requested a before and after image example.
Here we go!
This is the RAW capture Meta Data.
What is Meta Data? Meta Data is the cameras recorded settings at time of image capture and looks like this.
The Meta data important stuff is toward the bottom of this panel which shows. Exposure 0.3sec at f29 Focal, length 20mm, ISO 50, Flash Did not fire, Canon 5D Mark II, Sigma 12-24mm
NOTE: What the meta data does not show is the focus information which is: Manual Focus set to 1meter (3-Feet) which is how 99% of all my wide-angle landscape/seascape photo are captured. On a trip-pod of course.
Here is the Straight Outta Camera raw Image.
Here are the post processing steps I used in ON1 PhotoRaw 2018
First step was to open the image in the Develop Module and make the adjustments as indicated in the screen shot above.
Next step was to move to the Effects Module making the list of adjustments below.
Haze Reduction
Sharpened slightly with the Fix Focus Preset
Next were a couple of color adjustments
Fall Preset to warm the image up a bit and bring out the yellow and orange tones.
Sky preset to bring out the blue in the sky
Increase Color preset to increase overall image colors
Tone Enhancer with Clarity Preset as you can see by the opacity slider this was a very small adjustment. You have to be careful with this adjustment because Tone Enhancer is in short a Contrast adjustment. If you add too much run the risk of making the image will actually loose some clarity.
Final adjustment was to bring up the light on the beach. The HDR Look panel does a great job with this. I used the Natural Preset and only lightly applied it. If you use too much you run the risk of glow and halo around clouds and other objects in an image. But, heck you may want that look and that is ok to. Remember you are the artist and your photo is an expression of your vision.
In the final steps I used the Eraser Tool to remove sensor dust and unwanted whispy clouds that I felt were a distraction.
Then I cropped a very small portion off the top and straitend the horizon line.
Here is the final image
Here is the before and after side by side.
If you have questions or comments let me know.
Steve
The short video below will demonstrate the use of color channels. The main focus in this video is Luminance. What is Luminance you ask?
Luminance is defined as
A State or quality of radiating or reflecting light.
